10 Steps to Mastering Textile Embroidery Design
10 Steps to Mastering Textile Embroidery Design,Textile embroidery is a fascinating art form that involves the use of threads, needles, and fabric to create intricate designs on textiles. To master this craft, one must follow these ten steps:,1. Choose your design: Decide on the theme or style you want to create for your embroidery project. This will set the tone for the rest of the process.,2. Research materials: Gather all the necessary supplies, including thread, needles, and fabric. Make sure you have enough to cover the entire design.,3. Plan your design: Use graph paper or a drawing tablet to plan out your design before starting. This will help you stay organized and ensure that you don't miss any details.,4. Practice stitches: Learn the basic stitches used in textile embroidery, such as running stitch, satin stitch, and cross stitch. Practice these stitches until they feel natural and comfortable.,5. Start with small areas: Begin by embroidering small areas of the design to get comfortable with the technique. This will also help you avoid getting frustrated if something doesn't turn out as expected.,6. Add color: Once you are confident with the basic stitches, add color to your design. This can be done by using different thread colors or adding decorative elements like beads or sequins.,7. Experiment with patterns: Try out different patterns and designs to find what works best for you. You may want to experiment with repeating patterns or using different shapes and sizes.,8. Take breaks: Taking breaks between stitches can help you stay focused and avoid burnout. Take time to rest your hands and relax your mind.,9. Reflect on your progress: Look back at your finished product and reflect on your progress. Be proud of yourself for completing the project and consider how you can improve your skills in the future.,10. Share your work: Show off your embroidery creations to friends and family members. This will give you inspiration and feedback on how you can improve your work in the future.
Introduction: Textile embroidery is a timeless art form that adds intricate details and beauty to garments. From delicate floral patterns to bold geometric designs, embroidery can transform simple fabric into something truly extraordinary. In this tutorial, we'll walk you through the process of creating stunning textile embroidery designs using various techniques and tools. Whether you're a beginner or an experienced artist, these step-by-step instructions will help you create beautiful embroidered pieces.

Step 1: Materials Selection Before starting any embroidery project, it's essential to select the right materials. Choose high-quality fabric for your design, as it will ensure a lasting result. You can find a variety of fabrics at your local craft store or online retailers.
| Material | Type | Purpose |
|---|---|---|
| Fabric | Cotton, silk, linen | High-quality fabric for your design |
| Embroidery Needles | Size 8/9 (USA) | Standard needle size for most projects |
| Embroidery Scissors | Regular scissors | For cutting fabric and threads |
| Embroidery Pins | Small, medium, large | To secure your workpiece |
| Embroidery Stitches | Backstitch, running stitch, satin stitch | Different stitches for different effects |
| Embroidery Floss | Colorful floss in shades of brown, pink, blue, green, etc. | Floss colors to match your design |
Step 2: Preparation Before beginning your embroidery project, make sure your work surface is clean and flat. Use a ruler to measure and mark your design on the fabric. This will help you align your stitches accurately. Cut out your design template if necessary.
| Preparation | Actions |
|---|---|
| Work Surface | Clean and flat surface for accurate measurements |
| Design Marking | Use a ruler to measure and mark your design on the fabric |
| Design Template | If needed, cut out your design template |
Step 3: Transferring Your Design Choose a transfer method that suits your design. One option is to use a transfer paper or fabric to transfer your design onto the fabric. Another option is to hand-draw your design directly onto the fabric. Once you have transferred your design, trim off any excess fabric.
| Transfer Method | Actions |
|---|---|
| Transfer Paper or Fabric | Choose a transfer method suitable for your design |
| Trim excess fabric | Remove any excess fabric from the transfer area |
Step 4: Stitching Your Design Using the correct thread color and size for your design, start stitching your design. Start with small stitches and gradually increase the size of your stitches to achieve the desired effect. Be mindful of the tension of your needle and avoid pulling too tight or too loose.
| Stitching Technique | Actions |
|---|---|
| Using the Right Thread Color and Size | Start with small stitches and gradually increase the size of your stitches |
| Tension Control | Avoid pulling too tight or too loose |
Step 5: Embellishments Once you have completed your basic embroidery pattern, add embellishments like beads, sequins, or ribbons to enhance your design. These additional elements can be added after the main stitching has been completed.
| Embellishments | Actions |
|---|---|
| Adding Embellishments | After completing the main stitching, add embellishments like beads, sequins, or ribbons |
Step 6: Final Touches Review your design for any errors or areas that need improvement. Adjust the stitches as needed and add finishing touches like a border around the edges or a decorative stitch at the center.
| Final Touches | Actions |
|---|---|
| Review and Adjust | Check for errors or areas that need improvement |
| Border and Decorative Stitches | Add a border around the edges or a decorative stitch at the center |
Step 7: Drying and Curing Allow your embroidery to dry completely before attempting to iron it. Ironing may cause damage to the stitching or fabric if not done properly. If using a hot iron, use a pressing cloth to protect the fabric.

| Drying and Curing | Actions |
|---|---|
| Allow embroidery to dry completely | Before ironing, allow embroidery to dry completely |
| Use a Pressing Cloth | Use a pressing cloth to protect the fabric during drying and curing |
Step 8: Displaying Your Work Display your finished embroidery piece in a prominent location to showcase its beauty. Consider hanging it on a wall or displaying it on a mantel to catch the eye.
| Displaying Your Work | Actions |
|---|---|
| Hang or Display | Display your finished embroidery piece in a prominent location to showcase its beauty |
Conclusion: Embroidery is a wonderful way to add texture and detail to any garment. With patience and practice, you can master the art of textile embroidery and create beautiful designs that will inspire others. Happy embroidering!
随着时尚产业的不断发展,纺织品印花已成为时尚界的重要元素,本文将通过丰富的图片展示,为大家带来纺织品印花教程,帮助大家更好地掌握印花技巧。
纺织品印花教程图片展示
以下是纺织品印花教程的图片展示,涵盖多种印花风格和技巧:
| 图片编号 | 印花风格 | 印花材料 | 制作步骤 | |
|---|---|---|---|---|
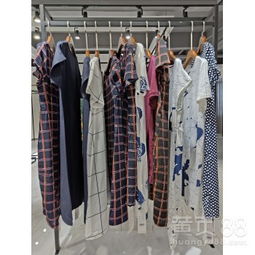
| 图片1 | 基础印花图案示例 | 经典图案 | 棉布、涤纶等天然纤维 | 步骤1:选择合适的印花图案 |
| 图片2 | 花卉印花效果展示 | 花卉主题 | 丝绸、亚麻等天然纤维 | 步骤2:使用印花机器进行花卉图案的印刷 |
| 图片3 | 抽象图案印花展示 | 抽象艺术风格 | 涤纶、尼龙等合成纤维 | 步骤3:运用创意设计抽象图案 |
| 图片4 | 多色印花技巧展示 | 多色组合 | 棉布、涤纶等不同材质混纺 | 步骤4:选择合适的颜色搭配进行印花制作 |
| 图片5 | 立体印花效果展示 | 立体效果 | 丝绸、涤纶等合成纤维面料 | 步骤5:运用立体印刷技术实现立体效果 |
纺织品印花教程案例分析

以下是一个纺织品印花教程的案例分析,以供参考:
丝绸与涤纶混纺印花
在混纺印花中,丝绸与涤纶的搭配是一种常见的组合,选择合适的丝绸面料和涤纶混纺材料,然后使用印花机器进行印刷,具体步骤包括选择合适的印花图案、使用适当的印刷工艺和颜色搭配,通过这样的案例,我们可以更好地理解纺织品印花的基本技巧和要点。
纺织品印花教程英文说明
以下是纺织品印花教程的英文说明表格: | 内容说明 | 相关图片说明 | | --- | --- | --- | | Introduction to Textile Printing Stitching Workshop | 本文将为大家介绍纺织品印花教程,包括多种印花风格和技巧,以及相关的制作步骤和案例分析。 | 上文中展示的图片示例 | | Printing Techniques for Textiles: Examples and Steps | 本文将通过图片展示和案例分析,为大家介绍纺织品印花的基本技巧和要点,展示基础印花图案示例、花卉印花效果展示等。 | 相关纺织品印花教程图片展示示例 | | Fabric Mixing and Blending for Silk and Polyester Blends | 在混纺印花中,丝绸与涤纶的搭配是一种常见的组合,本文将分析混纺印花的基本技巧和要点,以及相关的制作案例。 | 混纺印花案例分析示例,涉及丝绸与涤纶混纺面料的选择、印刷工艺和颜色搭配等。 |
本文通过丰富的纺织品印花教程图片展示和案例分析,为大家带来了纺织品印花教程的相关知识,希望本文能够帮助大家更好地掌握纺织品印花技巧,提高自己的纺织技能水平。
Articles related to the knowledge points of this article:
A Comprehensive Guide to Setting Up a Textile Company
The Fabric of Growth:An Insight into Ningbos Textile Industry
The New A District Licensed Textile Wholesale Market
The Story of Anqing Development Zones Fuhua Textile Wholesale Department