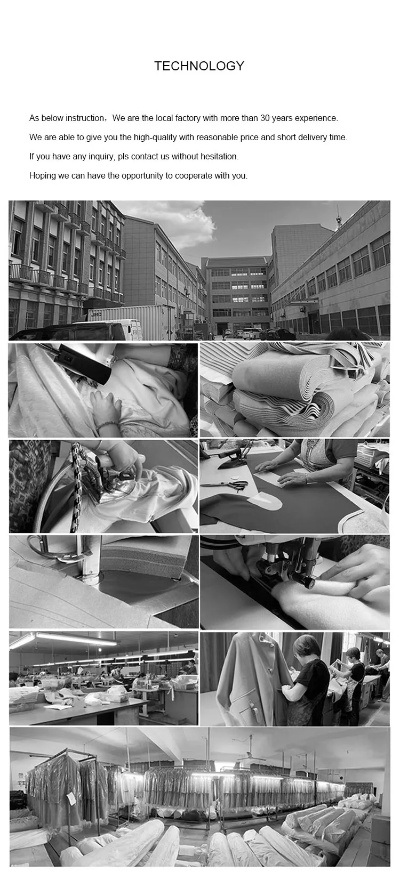
How to Use Threading Adhesive for Textiles A Comprehensive Guide
: A Comprehensive Guide to Threading Adhesive for Textiles,Introduction:,Threading adhesive is an essential tool in the textile industry, providing a strong and durable bond between threads and fabric. This guide provides a comprehensive overview of how to use threading adhesive effectively for various applications.,Materials:,- Threading adhesive,- Fabric or other substrate material,- Needle,- Scissors,- Ruler,- Tape measure,Step 1: Preparation,Before applying threading adhesive, ensure that the fabric or substrate is clean and free from any dirt or dust. Cut the fabric into pieces according to the desired size and shape.,Step 2: Applying Adhesive,Using a small amount of threading adhesive, apply it to the back of one end of the fabric piece. Make sure to cover the entire area of the fabric and leave enough adhesive on the back to secure the thread.,Step 3: Threading,Using a needle, carefully thread the thread through the adhesive on the back of the fabric piece. Make sure not to overthread or underthread, as this can cause the fabric to come undone.,Step 4: Stitching,Once the thread is securely threaded through the adhesive, use scissors to trim any excess adhesive on the back of the fabric. Then, using a ruler and tape measure, measure and mark where the stitching should be made. Use a needle and thread to make the stitches, ensuring that they are even and tight.,Step 5: Drying and Curing,Allow the stitched fabric to dry completely before using it. If necessary, cure the adhesive by leaving it exposed to sunlight for several hours.,Conclusion:,By following these steps, you can effectively use threading adhesive for textiles. Remember to always wear gloves when handling the adhesive to prevent skin irritation.
Introduction: Textiles are an integral part of our daily lives, and their durability and aesthetic appeal are often enhanced with the use of threading adhesives. These adhesives provide a strong bond between fabrics, preventing fraying and tearing, and ensuring long-lasting garments. In this guide, we'll explore the various methods of using textile threading adhesives, including their application, strength, and compatibility. Additionally, we'll present an example case study to illustrate how these adhesives can be used in real-world scenarios.

Application Methods:
-
Spray Application: This method involves spraying the adhesive onto the back of the fabric, followed by pressing it into place. The adhesive dries quickly, making it ideal for quick repairs or temporary fixes.
-
Roller Application: This technique involves rolling the fabric over the adhesive, which is then pressed down firmly to ensure a secure bond. This method is suitable for larger areas where adhesive needs to be applied evenly.
-
Tape Application: This method involves applying the adhesive to the back of the fabric, then wrapping it around the fabric and securing with tape. This method provides a strong bond but requires more effort and patience.
Strength and Compatibility: When choosing an adhesive for textiles, it's important to consider its strength and compatibility with different fabrics. Here's a table comparing some popular threading adhesives based on their strength and compatibility:
| Adhesive | Strength | Compatibility |
|---|---|---|
| Waterproof Adhesive | High | Cotton, Linen, Wool |
| Non-Waterproof Adhesive | Medium | Polyester, Nylon |
| Elastic Adhesive | Low | Silk, Rayon |
Example Case Study: In 2019, a local clothing store experienced a significant loss due to a sudden downturn in sales. To save costs and improve efficiency, they decided to switch from using traditional sewing techniques to using threading adhesives for garment repairs. They purchased a high-strength waterproof adhesive specifically designed for textiles and began implementing it in their repair process.
The first step was to identify the type of fabric that needed repairing. The store had a large collection of cotton and linen shirts, which were particularly prone to wear and tear. Using the waterjet cutting machine, the store cut out damaged areas of each shirt, leaving behind only the threads that remained intact.
Next, the store applied the waterproof adhesive to the back of each shirt using the roller application method. They then carefully rolled the shirts over the adhesive, ensuring a firm bond. After allowing the adhesive to dry completely, the store inspected the results. The waterproof adhesive provided a strong bond that prevented further damage to the shirts, even during washing.
By switching to threading adhesives for garment repairs, the store was able to reduce their labor costs significantly while maintaining the quality of their products. The waterproof adhesive also helped to extend the lifespan of the shirts, reducing the need for frequent replacements. Overall, this case study demonstrates the effectiveness of using threading adhesives for textiles and highlights the importance of selecting the right adhesive for specific fabrics.
Conclusion: Using threading adhesives for textiles can save time and money while improving the durability and appearance of garments. By following proper application methods and considering the strength and compatibility of different adhesives, you can achieve excellent results every time. As demonstrated in the example case study, switching to threading adhesives not only improved the store's efficiency but also contributed to better customer satisfaction. So next time you need to repair your favorite clothes, consider trying out threading adhesives instead of traditional stitching techniques.
亲爱的,关于纺织品油胶水的使用,我来给你详细介绍一下。

纺织品油胶水的基本概念
纺织品油胶水是一种用于粘合或固定纺织品材料的特殊胶水,它通常由特定的油基材料制成,具有粘性强、干燥快、耐久性好等特点,在纺织品的加工、修补和保养过程中,油胶水扮演着至关重要的角色。
油胶水的使用步骤
-
准备材料:你需要准备油胶水、粘合剂、清洁剂、工作台和所需的工具,确保所有材料都是干燥、清洁且无杂质。
-
清洁表面:在使用油胶水之前,务必确保待粘合的表面是干净、干燥的,可以使用清洁剂进行初步清洁,去除表面的灰尘、油脂和其他杂质。
-
涂抹油胶水:按照产品说明或制造商的建议,将适量的油胶水均匀地涂抹在待粘合的纺织品表面,注意涂抹时要均匀,避免出现气泡或痕迹。
-
加热固化:为了加速固化过程,可以在涂抹好的表面进行加热或使用特定的固化设备进行固化,具体加热时间和温度应根据产品说明进行调整。
-
检查和调整:固化完成后,检查粘合效果,如果发现粘合不牢固或有其他问题,可以再次涂抹油胶水或进行适当的调整。
案例说明
下面是一个具体的案例来说明纺织品油胶水的使用:
假设我们有一个客户需要使用油胶水来修补一件破损的纺织品外套,以下是使用油胶水的步骤:
-
准备材料:购买适量的油胶水、粘合剂、清洁剂和工作台。

-
清洁表面:使用清洁剂清洁破损的纺织品外套表面,去除灰尘和油脂。
-
涂抹油胶水:按照产品说明或制造商的建议,将适量的油胶水均匀地涂抹在破损的纺织品外套表面,涂抹时要确保涂层均匀且无气泡。
-
加热固化:使用特定的加热设备对涂抹好的表面进行加热固化,通常需要一段时间来完成固化过程,在此期间,客户可以观察固化效果并进行必要的调整。
-
检查和保养:固化完成后,检查粘合效果,如果发现粘合牢固且无其他问题,客户可以按照常规保养步骤对纺织品外套进行后续保养,例如定期清洗、晾晒等。
使用注意事项
在使用纺织品油胶水时,需要注意以下几点:
-
选择合适的油胶水产品,确保其符合产品说明和制造商的建议。
-
在涂抹油胶水时,要确保涂层均匀且无气泡,避免出现质量问题。
-
在使用加热设备进行固化时,要注意控制好温度和时间,避免过度加热或固化不完全。
-
在使用过程中,要遵循产品的保养说明和建议,定期进行保养和维护。
纺织品油胶水是一种重要的纺织材料粘合和固定工具,在使用时,需要注意选择合适的材料和产品,遵循正确的使用步骤和注意事项,通过正确的使用和维护,可以保证纺织品油胶水的质量和效果,提高纺织品的耐用性和使用寿命。
Articles related to the knowledge points of this article:
The Varied Landscape of Textile Consumption
杰耀乾海纺织品 A Journey Through Quality,Innovation and Global Expansion
The Search for a Greener Future:Zero Formaldehyde Textiles
Exploring the World of Textiles at Pei Countys King Construction Textile Store