How to Make an Eco-Friendly Textile Box
Creating an eco-friendly textile box can be a great way to reduce waste and promote sustainability. Here are some steps to follow:,1. Choose materials that are biodegradable or recyclable, such as organic cotton, hemp, or recycled paper.,2. Use natural dyes and inks instead of synthetic ones, which can harm the environment.,3. Avoid using harmful chemicals in the manufacturing process, such as formaldehyde or phthalates.,4. Sew or glue the box together instead of using glues or adhesives that contain toxic chemicals.,5. Store items within the box to keep them organized and prevent spills or leaks.,By following these steps, you can create a sustainable textile box that is both beautiful and environmentally friendly.
Introduction: In today's world, where sustainability is increasingly becoming a priority, making eco-friendly textile boxes has become a trendy and practical way to reduce waste and promote environmental consciousness. Here, we will guide you through the process of making an eco-friendly textile box using simple materials like fabric scraps, paper, and glue. This tutorial will not only be informative but also entertaining, as we'll incorporate some fun facts about textiles and their history. Let's get started!
Materials List:
- Fabric scraps (10 x 10 cm squares)
- Paper (for the box's sides and lid)
- Glue
- Scissors
- Pins
- Ruler
- Tape measure
Step 1: Preparing Your Fabric Scraps Gather your fabric scraps and cut them into 10 x 10 cm squares. Choose fabrics that are easy to work with and have similar colors to avoid color blending when sewing together.

Step 2: Cutting Your Paper Fold a sheet of paper in half lengthwise and then in half widthwise. Fold each half again lengthwise and widthwise to create a triangle. This will serve as the box's side panels.
Step 3: Making the Box's Sides Using the ruler and tape measure, draw lines on your fabric squares to mark the center point of each square. Then, fold each square in half diagonally along the marked line to create a triangle. Pin these triangles together along the edges, leaving a small gap between them. Once all four triangles are pinned together, trim off any excess fabric.
Step 4: Assembling the Sides Place one side panel against the other, matching the points where the triangles were pinned together. Use glue to attach the sides together, making sure they are securely held in place. Repeat this for the other two sides.
Step 5: Adding the Lid For the lid, cut a piece of paper large enough to cover the entire opening of the box. Fold the paper in half lengthwise and then in half widthwise to form a triangle. Repeat the folding process for both dimensions until you have a square piece of paper.
Step 6: Assembling the Lid Position the lid over the top of the box's sides, aligning the corners of the paper with the corresponding points on the sides. Use glue to secure the lid in place.
Step 7: Final Touches Once everything is assembled, trim any excess fabric around the edges. If desired, you can decorate the outside of the box with fabric scraps or add a decorative stitching pattern.
Case Study: Imagine a textile artist named Sarah who loves to repurpose old clothes into unique pieces of art. She recently made a textile box out of a tattered shirt she had lying around. Instead of discarding it, Sarah decided to transform it into a functional piece of furniture. By following our step-by-step guide, she was able to make a beautiful and eco-friendly textile box that serves as both a storage solution and a statement piece in her home. Sarah's creativity and resourcefulness showcase how even small items can be transformed into something beautiful and useful.
Conclusion: Making an eco-friendly textile box is not only a fun project but also a great way to reduce waste and promote sustainability. With just a few basic materials and a bit of patience, anyone can create their own unique and stylish textile box. So why not give it a try? Who knows, you might end up with a new favorite item in your home collection!
大家好,今天我们来探讨一下如何用简单的步骤和技巧制作生态纺织品盒子,随着环保意识的提高,越来越多的人开始关注如何将环保理念融入日常生活中的各种物品制作中,生态纺织品盒子作为一种环保包装材料,受到了广泛的关注和喜爱。

制作步骤
材料准备
我们需要准备以下材料:
(此处可添加材料清单表格)
折叠方法
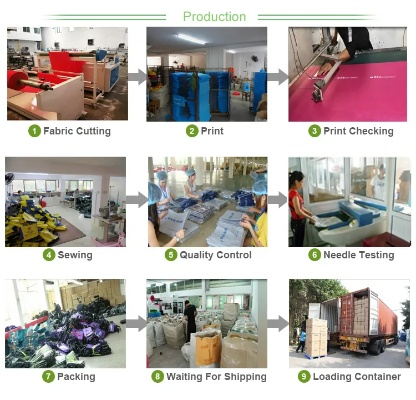
以下是生态纺织品盒子的折叠步骤:
(1)根据需要折叠的盒子大小,选择合适的纸张或布料。
(2)按照纸张或布料的纹理和形状,绘制出盒子的基本折痕。
(3)将纸张或布料沿着折痕折叠,注意保持平整和对称。
(4)用剪刀或裁剪刀剪出所需的形状和图案,完成折叠。

案例说明
为了更好地理解这个过程,我们可以看一个具体的案例:
假设我们想要制作一个环保型的购物袋盒子,我们可以按照以下步骤进行折叠:
选择合适的纸张或布料作为盒子材料,根据需要折叠的形状和大小,绘制出基本的折痕,将纸张或布料沿着这些折痕折叠,注意保持平整和对称,可以根据需要添加一些装饰元素,如贴纸、丝带等,使盒子更加美观。
英文案例说明(表格形式)
以下是一个英文案例说明表格:
| 步骤 | 描述 | 英文说明 | 示例材料 | 步骤说明 | 注意事项 |
|---|---|---|---|---|---|
| 材料准备 | 选择环保材料制作盒子 | Prepare environmental-friendly materials for box | 纸张、布料等 | 根据需要选择合适的材料进行制作 | |
| 折叠方法 | 根据盒子形状和大小进行折叠 | Fold according to the shape and size of the box | 根据纸张或布料的纹理和形状绘制折痕,保持平整和对称 | 注意保持折叠的平整性和对称性 | |
| 具体步骤 | 开始折叠 | Start folding the box | 开始折叠过程 | 按照上述步骤进行折叠 | 注意保持折叠的细节和精度 |
| 通过上述步骤可以制作出美观实用的生态纺织品盒子 | A beautiful and practical ecological textile box can be made through the above steps | 通过上述步骤可以制作出环保型的购物袋盒子等 | 通过绘制折痕、选择合适的材料和折叠细节等步骤可以完成制作 | 注意环保理念和材料选择的重要性 |
通过以上的介绍和案例说明,我们可以看到制作生态纺织品盒子的过程并不复杂,只需要选择合适的材料和按照一定的步骤进行折叠即可完成,我们也需要注意环保理念和材料选择的重要性,希望这个指南能够帮助大家更好地了解如何制作生态纺织品盒子,同时也能够提高大家的环保意识。
Articles related to the knowledge points of this article:
The Story of Double Connect Textiles:A Multinational Textile Company
The Transformative Journey of Guangdong Hanbo Textiles Company
High-End Fashion Trends with Lanlan Textiles